The buzzer module is the most common choice for audio communication between a user and a device. So this module plays a key role in most devices like doorbells, household appliances, alarm clocks, etc. The main function of a buzzer is to change an electrical signal into an audio sound. So these modules are categorized into two different types an active buzzer and a passive buzzer. This article explores a KY-012 active buzzer module, internal structure, working, and its applications.
What is a KY-012 Active Buzzer Module?
The KY-012 is a small active buzzer module that generates a sound whenever it is powered. This module contains an in-built oscillator circuit that produces a fixed frequency sound wave without needing any outside signal to control the sound. So this module is used commonly in different electronic projects with Arduino wherever you need to turn on or off the sound through a digital pin. These buzzers most of the time generate a single and pre-determined sound frequency that cannot be adjusted easily. The voltage range of this buzzer ranges from 1.5V – 24Volts. So they can generate 2kHz±300Hz sound frequency. Its current consumption is about ≤ 25mA.
KY-012 Active Buzzer Module Design
The KY-012 active buzzer module construction is shown below. This module has a metal disk, metal weight, round magnet, and wire coil. The basic thought of generating sound is through vibrations which are noticed in human vocal cords. Thus, this is a type of magnetic buzzer where there is a wire coil within the module that is connected to the pins of a buzzer.
In addition, there is a round magnet in this module that surrounds the wire coil. So a thin and flexible ferromagnetic metal disk with a tiny metal weight is connected above the round magnet & wire coil of a module. Whenever current pulses are provided to the wire coil then magnetic inductance will cause the metal weight & metal disk to pulsate up and down. So the metal disk’s vibration generates sound waves.
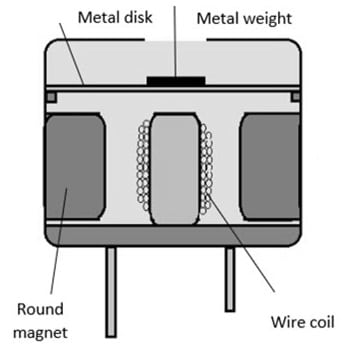
KY-012 Active Buzzer Module Design
Working
An active buzzer module functions directly by generating a sound signal whenever a DC voltage is applied to it. This module includes an oscillating circuit that produces the required square wave signal to pulsate a piezoelectric element and creates sound. So whenever a power supply is provided to the right pins to make it beep, no additional circuitry is necessary to make the sound signal.
Generally, the positive pin of this module is connected to power, the negative pin is connected to GND, and then it will start generating a sound immediately at a fixed frequency. Thus, most of the active buzzers include a set frequency that cannot be adjusted easily.
Pin Configuration:
The KY-012 active buzzer module pin configuration is shown below. So this module includes two pins which are explained below.
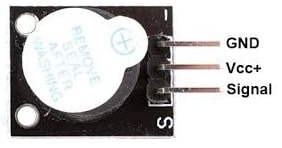
KY-012 Module Pin Configuration
- Pin (S or Signal): It is a signal pin that provides the signal to the module to drive the buzzer.
- Pin (VCC ): This is a voltage supply pin that provides the voltage supply for the buzzer to function in the module.
- Pin (GND): This is the leftmost pin or ground pin of the module.
Features & Specifications:
The features and specifications of the KY-012 active buzzer module include the following.
- KY-012 is an active buzzer module.
- This module includes three pins.
- Its operating voltage ranges from 3.3V to 5V DC.
- Its current rating is 30 mA at 5V DC.
- The resonance frequency ranges from 2500Hz to ± 300Hz.
- This module size is 3.3 x 1.3 x 1.2 cm.
- The sound output minimum is at 10cm is 85dB
- The working temperature of this module ranges from -20°C ~ 70°C.
- Storage temperature ranges from -30°C to 105°C.
Equivalents & Alternatives
Equivalent KY-012 active buzzer modules are; KY-006, KY-012, etc. So alternative buzzer modules are; PZT-164, KY-022, etc.
KY-012 Active Buzzer Module Interfacing with Arduino
The KY-012 Active buzzer module interfacing with Arduino Uno is shown below. So this interfacing helps us to connect the Arduino Board with the KY-012 buzzer module properly. The required components to make this interfacing mainly include a KY-012 active buzzer module, an Arduino Uno board, and connecting wires.
The connections of this interfacing follow as;
- Connect the KY-012 Buzzer Module’s GND pin to the Arduino Board’s GND pin.
- The middle pin of this module is connected to the 5V pin of the Arduino.
- The signal pin of the buzzer module is connected to pin-11 of the Arduino Board.
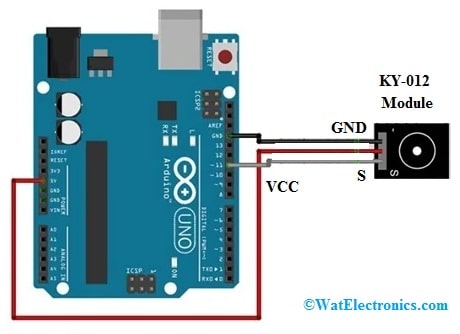
KY-012 Active Buzzer Module Interfacing with Arduino
Code:
The required code for interfacing the KY-012 active buzzer module with the Arduino board is shown below.
int buzzerPin = 11; // initializing the buzzer pin at pin 11 of Arduino
void setup() { // Code written in it will only run once
pinMode(buzzerPin, OUTPUT); // This will set the pin 11 as output
beep(50); // This will make a beep sound Beep
beep(50);
delay(1000); //Adding a delay of 1 sec.
}
void loop() { // Code written in it will run continuously
beep(50); // This will make a beep sound after every 500 milliseconds
delay(1000); // Adding a delay of one second.
}
void beep(unsigned char delayms) { // Created a function for beep
analogWrite(buzzerPin, 20); // This will set pin 11 to high
delay(delayms); // Giving a delay
analogWrite(buzzerPin ,0); // This will set pin 11 to LOW
delay(delayms); // Giving a delay
}
Working
Initially, we assign the buzzer pin to power the module. In the void setup(), we set the buzzer pin like the output with the pinMode() function. After that, we utilize the beep function() through a 50 parameter & 1 sec (or) 1000 ms delay.
The code in the void loop() function continuously runs thus, again we have called the beep function in this section with 50 parameters. So this parameter delays the beep hum for 500 ms each time the beep calls the function.
Finally, in the beep() function, we utilize the analogWrite() function for setting the buzzer pin-11 of the Arduino to HIGH. After that, 500 ms delay with the function argument, we set the pin 11 or buzzer pin to LOW. Once more with the analogWrite() function with another 500 ms delay. So this function tops, and again the program moves into the void loop() function. Thus this cycle keeps replicating itself constantly.
Open the Arduino IDE & go to File- > New to create a new file. After that copy the code & paste it within the Arduino File. So choose the COM port of the Arduino board connected & click on Upload. So this will upload the sketch into the Arduino board then the buzzer starts generating sound at a 2 kHz frequency.
Active Buzzer Module and Passive Buzzer Module
The difference between the active buzzer module and the passive buzzer module includes the following.
|
Active Buzzer Module |
Passive Buzzer Module |
| An active buzzer is an electronic device that generates sound whenever a DC voltage is provided to it. | A passive buzzer is also an electronic device that generates sound whenever an external signal is provided to it. |
| This buzzer includes an oscillator circuit that generates sound by vibrating a piezoelectric material. | It does not contain an internal oscillator to generate sound but it depends on a microcontroller’s external signal to create various tones depending on the input frequency. |
| This module is very simple to use. | It is very complex to use. |
| It generates a single tone. | This module generates a variety of tones. |
| This module is suitable for simple projects. | It is suitable for complex projects. |
| Its rated voltage is 6V DC. | Its rated voltage ranges from 3V to 5 V. |
| Rated current is ≤30mA. | This module’s rated current is <25 mA. |
| The resonant frequency will be 2,300 ±300Hz. | The resonant frequency will be 2,048 Hz. |
| Its frequency ranges from 2 to 4 kHz. | Frequency ranges from 50 to 14,000 Hz. |
Advantages & Disadvantages
The advantages of KY-012 active buzzer modules include the following.
- The KY-012 module generates a loud sound with 85 dB minimum volume.
- These are suitable for mainly battery-powered projects.
- This buzzer module is simple to integrate into electronic projects.
- This module is well-matched with microcontrollers like Raspberry Pi, ESP32, Arduino, etc.
- It doesn’t need external.
- No external square-wave voltage required: Unlike a passive buzzer, the KY-012 automatically generates the necessary square-wave voltage to emit a tone.
- It is a self-generating module.
- This buzzer module includes holes to fix it with a bolt.
- This module is useful for generating audible alarms within many applications.
The disadvantages of KY-012 active buzzer modules include the following.
- The KY-012 module can generate sound whenever it is connected to a battery.
- These are expensive.
- It has a fixed frequency so they can limit the flexibility to modify the sound.
- They need extra circuit components and, an oscillator (or) signal generator.
- These modules cannot generate different tones.
- These are less flexible as compared to transducers.
Applications
The applications of KY-012 active buzzer modules include the following.
- The KY-012 module triggers an acoustic alarm.
- It is used in warning systems to create audible alarms within consumer devices.
- This module creates audible alarms within home automation systems.
- This module generates an audible alarm within many applications like home automation, consumer electronics, industrial electronics, etc.
- These modules are utilized in many systems and devices which include printers, computers, copiers, home appliances, alarms, etc.
- These are used in photocopiers, washing machines, refrigerators, disinfection cabinets, cameras, etc.
- These are used in fire alarms to alert people when a fire occurs.
- This module is used in security systems to alert people when an intrusion occurs.
- Buzzers indicate whenever a timer has finished
- These are used to verify user input like keystrokes or mouse clicks.
Please refer to this link for the KY-012 Active Buzzer Module Datasheet.
Thus, this is an overview of the KY-012 active buzzer module, pinout, features, specifications, interfacing, and its applications. So the KY-012 Buzzer module generates a single-tone sound whenever it gets a high signal approximately 2.5kHz sound. This module is compatible with different microcontrollers like ESP32, Arduino, and Raspberry Pi. Thus. here is a question for you, what is the PZT-164 module?