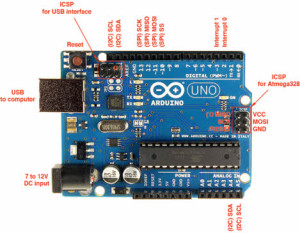
Arduino Uno Board
Arduino is a single-board microcontroller meant to make the application more accessible which are interactive objects and its surroundings. The hardware features with an open-source hardware board designed around an 8-bit Atmel AVR microcontroller or a 32-bit Atmel ARM. Current models consists a USB interface, 6 analog input pins and 14 digital I/O pins that allows the user to attach various extension boards.
The Arduino Uno board is a microcontroller based on the ATmega328. It has 14 digital input/output pins in which 6 can be used as PWM outputs, a 16 MHz ceramic resonator, an ICSP header, a USB connection, 6 analog inputs, a power jack and a reset button. This contains all the required support needed for microcontroller. In order to get started, they are simply connected to a computer with a USB cable or with a AC-to-DC adapter or battery. Arduino Uno Board varies from all other boards and they will not use the FTDI USB-to-serial driver chip in them. It is featured by the Atmega16U2 (Atmega8U2 up to version R2) programmed as a USB-to-serial converter.
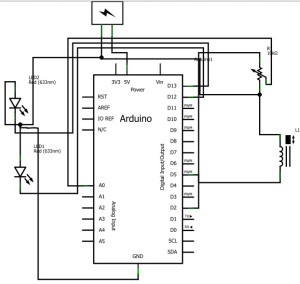
Arduino Uno with Digital Input/Output
There are various types of Arduino boards in which many of them were third-party compatible versions. The most official versions available are the Arduino Uno R3 and the Arduino Nano V3. Both of these run a 16MHz Atmel ATmega328P 8-bit microcontroller with 32KB of flash RAM 14 digital I/O and six analogue I/O and the 32KB will not sound like as if running Windows. Arduino projects can be stand-alone or they can communicate with software on running on a computer. For e.g. Flash, Processing, Max/MSP). The board is clocked by a 16 MHz ceramic resonator and has a USB connection for power and communication. You can easily add micro SD/SD card storage for bigger tasks.
Features of the Arduino Uno Board:
- It is an easy USB interface. This allows interface with USB as this is like a serial device.
- The chip on the board plugs straight into your USB port and supports on your computer as a virtual serial port. The benefit of this setup is that serial communication is an extremely easy protocol which is time-tested and USB makes connection with modern computers and makes it comfortable.
- It is easy-to-find the microcontroller brain which is the ATmega328 chip. It has more number of hardware features like timers, external and internal interrupts, PWM pins and multiple sleep modes.
- It is an open source design and there is an advantage of being open source is that it has a large community of people using and troubleshooting it. This makes it easy to help in debugging projects.
- It is a 16 MHz clock which is fast enough for most applications and does not speeds up the microcontroller.
- It is very convenient to manage power inside it and it had a feature of built-in voltage regulation. This can also be powered directly off a USB port without any external power. You can connect an external power source of upto 12v and this regulates it to both 5v and 3.3v.
- 13 digital pins and 6 analog pins. This sort of pins allows you to connect hardware to your Arduino Uno board externally. These pins are used as a key for extending the computing capability of the Arduino Uno into the real world. Simply plug your electronic devices and sensors into the sockets that correspond to each of these pins and you are good to go.
- This has an ICSP connector for bypassing the USB port and interfacing the Arduino directly as a serial device. This port is necessary to re-bootload your chip if it corrupts and can no longer used to your computer.
- It has a 32 KB of flash memory for storing your code.
- An on-board LED is attached to digital pin 13 to make fast the debugging of code and to make the debug process easy.
- Finally, it has a button to reset the program on the chip.
Arduino was created in the year 2005 by two Italian engineers David Cuartielles and Massimo Banzi with the goal of keeping in mind about students to make them learn how to program the Arduino uno microcontroller and improve their skills about electronics and use it in the real world.
Arduino uno microcontroller can sense the environment by receiving input from a variety of sensors and can affect its surroundings by controlling lights, motors, and other actuators. The microcontroller is programmed using the Arduino programming language (based on Wiring) and the Arduino development environment (based on Processing).
ATmega168/328-Arduino Pin Mapping:
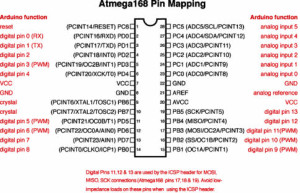
ATmega168-328Arduino Pin Mapping
Programming:
- The Arduino integrated development environment (IDE) is a cross-platform application written in Java, and is derived from the IDE for the Processing programming language and the Wiring projects
- The Arduino Uno board can be programmed with the Arduino software.
- Select “Arduino Uno from the Tools > Board menu (according to the microcontroller on your board).
- The ATmega328 on the Arduino Uno comes preburned with a bootloader that allows you to upload new code to it without the use of an external hardware programmer. It communicates using the original STK500 protocol.
- You can also bypass the bootloader and program the microcontroller through the ICSP (In-Circuit Serial Programming) header.
- The ATmega16U2 (or 8U2 in the rev1 and rev2 boards) firmware source code is available .
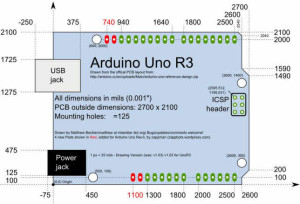
Pin Diagram of Arduino Uno
The ATmega16U2/8U2 is loaded with a DFU bootloader, which can be activated by:
- On Rev1 boards: connecting the solder jumper on the back of the board (near the map of Italy) and then resetting the 8U2.
- On Rev2 or later boards: there is a resistor that pulling the 8U2/16U2 HWB line to ground, making it easier to put into DFU mode.
Please refer to this link to know more about Arduino Projects for Engineering Students
You can then use Atmel’s FLIP software (Windows) or the DFU programmer (Mac OS X and Linux) to load a new firmware. Or you can use the ISP header with an external programmer (overwriting the DFU bootloader).
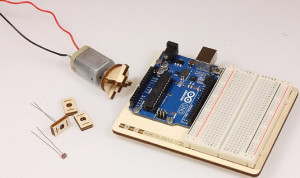
Arduino Uno Starter Kit
Microcontroller ATmega328
Operating Voltage 5V
Input Voltage (recommended) 7-12V
Input Voltage (limits) 6-20V
Digital I/O Pins 14 (of which 6 provide PWM output)
Analog Input Pins 6
DC Current per I/O Pin 40 Ma
DC Current for 3.3V Pin 50 Ma
Flash Memory 32 KB (ATmega328) of which 0.5 KB used by bootloader
SRAM 2 KB (ATmega328)
EEPROM 1 KB (ATmega328)
Clock Speed 16 MHz
Real-Time Applications of Arduino Uno Board
Arduino Based Home Automation System
The project is designed by using Arduino uno board for the development of home automation system with Bluetooth which is remotely controlled and operated by an Android OS smart phone. Houses are becoming smarter and well developed by using such kind of advanced technologies. Modern houses are gradually increasing the way of design by shifting to centralized control system with remote controlled switches instead of conventional switches.
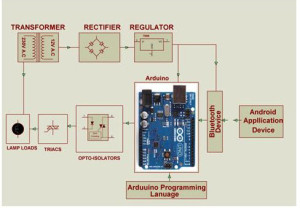
Arduino Based Home Automation
In order to achieve this, a Bluetooth module is interfaced to the Arduino Uno board at the receiver end while on the transmitter end, a Graphical User Interface application on the cell phone sends ON/OFF commands to the receiver where loads are connected. By touching the identified location on the Graphical User Interface, lamps are used as loads in this project can be turned ON/OFF remotely by using this technology. The loads are operated by using Arduino Uno board through thyristors using triacs and OPTO-Isolators.
Arduino based Auto Intensity Control of Street Lights
As the intensity is cannot be controlled by using High Intensity Discharge (HID) lamps power saving is not possible in street lights with these lamps as the density on roads is decreasing from peak hours of nights to early morning.
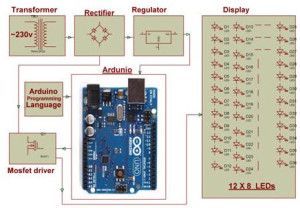
Arduino Based Auto Intensity Control
Thus, this system overcomes this problem by controlling the intensity of LED lights on street by gradually reducing intensity by controlling the voltage applied to these lamps. This system uses arduino board to produce PWM pulses and it is programmed in such a way that it decreases the voltage applied to these lamps gradually till late nights and completely shutdowns at morning.
Thus, Arduino development board can sense the environment by receiving input from different sensors and affects its surroundings by controlling motors, lights and other actuators. The microcontroller on the board is programmed using the Arduino programming language. Thanks for your attention to this article and clarify doubts about Arduino projects by commenting below.
Photo Credits:
- Arduino Uno Board by adafuit
- Arduino Uno with Digital Input/Output by cprogramming
- ATmega168/328-Arduino Pin Mapping by arduino
- Pin Diagram of Arduino Uno by cmb
- Arduino starter kit by generationrobots