Home automation is no longer a luxury — it’s now affordable and achievable even for beginners. In this article, we’ll walk you through a voice-controlled home automation project using an ESP8266 Wi-Fi module and IFTTT, with no coding required. Whether you’re automating a lamp or your entire home lighting, this voice-controlled home automation guide has you covered.
Voice-Controlled Home Automation using IFTTT and ESP8266
The required components for basic lamp control include the following.
- ESP8266 NodeMCU,
- Single-channel Relay Module (10A, 250V AC),
- Smartphone with Google Assistant,
- Blynk IoT App (Free version),
- IFTTT Account,
- Lamp (AC),
- Jumper wires + Breadboard.
- USB cable for programming,
- 5V Power supply for ESP8266,
- The required components for whole-home lighting control include the following.
- ESP8266 NodeMCU or Raspberry Pi (optional for local server).
- Smart DIN-rail Relay (e.g., Shelly Pro 4 PM / Shelly 1 PM / Sonoff 4CH Pro R2).
- Certified Enclosure Box.
- MCB, fuses, varistors (for safety).
- Wiring tools & licensed electrician.
How does the Voice-Controlled Home Automation System Work?
- You say, “Turn on the living room light.”
- Google Assistant hears it and triggers an IFTTT Applet.
- IFTTT sends an HTTP request to the Blynk Cloud.
- Blynk sends a command to the ESP8266, which turns ON/OFF the relay.
- The relay switches the connected appliance/light accordingly.
- There’s no need to write any code — just use webhooks and logic blocks.
Step-by-Step Setup
Step 1: Install the Blynk App
- Download from the Play Store/App Store
- Create an account
- Create a new Device Template → Select ESP8266 → Add a Virtual Pin (V1)
- Get the Auth Token and save it for IFTTT
Step 2: Wiring the ESP8266 and Relay
The basic wiring for lamp control is shown below.
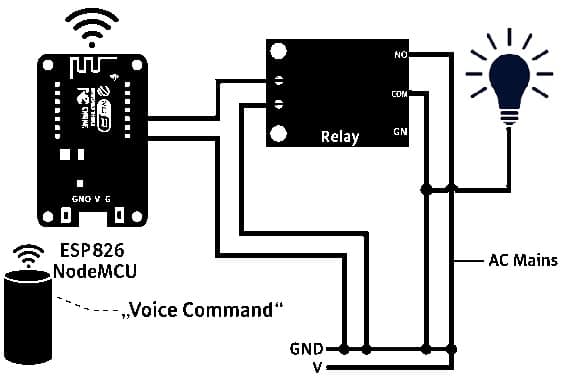
Voice-Controlled Home Automation
- Connect the D1 (GPIO5) pin of the ESP8266 to the IN pin of the relay module.
- Connect the GND pin of the ESP8266 to the GND pin of the relay module.
- Connect the 3.3V pin of the ESP8266 to the VCC (or 5V if supported) pin of the relay module.
- Connect the AC lamp to the relay’s NO-COM terminals.
- Plug the ESP8266 into USB power.
Safety Note:
Never touch mains voltage unless you are trained. Work with plug-in lamps or use low-voltage DC lights during testing.
Step 3: Configure Blynk Button (Optional)
Add a Button widget linked to Virtual Pin V1
Set Mode = Switch, ON = 1, OFF = 0
Step 4: Set Up IFTTT
Visit IFTTT.com
Create a new Applet:
IF: “Google Assistant → Say a phrase like…”
THEN: “Webhooks → Make Web Request”
Web Request Details:
URL: http://blynk.cloud/external/api/update?token=Your_Auth_Token&v1=1 (to turn ON)
Method: GET
Content Type: application/json
Use v1=0 to turn OFF
Repeat for both ON and OFF commands.
Upgrading to Full Home Automation
If you want to control multiple lights, ceiling fans, or zones in your home:
Recommended Hardware:
- Shelly Pro 4 PM or Shelly 1 PM smart relay.
- Rated: 16A per channel, 230V AC.
- DIN-rail mountable for home distribution board.
- Built-in Wi-Fi + MQTT + REST API support.
Integration:
- Set up the Shelly device with its app.
- Use IFTTT or Blynk, or Home Assistant for voice commands.
- Use Google Assistant → Webhook → Shelly API endpoint to toggle each zone.
Example:
http://shelly-device-ip/relay/0?turn=on
Important: These devices are certified for mains use. Installation should be done by a licensed electrician.
Safety & Load Ratings
| Appliance |
Recommended Relay Rating |
|
Table Lamp (<100W) |
10A Mechanical Relay (OK) |
|
Ceiling Fan (120W) |
5A–10A (Inductive Load) |
|
Tube Light/LED |
5A Relay |
| AC/Heavy Loads |
Smart Switches or Contactors |
| Whole House |
DIN Rail 16A Smart Relays |
Always use fuses and proper insulation when dealing with high-voltage devices.
Advantages
The advantages of voice-controlled home automation include the following.
- No programming required.
- Compatible with Google Assistant and Alexa.
- Easily upgradable to full home automation.
- Secure, scalable, and customizable.
Disadvantages
The disadvantages of voice-controlled home automation include the following.
- Depends on internet connectivity.
- Not suitable for mission-critical equipment.
- Delays may occur due to cloud-based triggering.
Voice-Controlled Home Automation Applications
The applications of voice-controlled home automation include the following.
- Bedroom or living room light control.
- Smart fan or heater switching.
- Office desk automation.
- Appliance scheduling.
- Full home lighting control with DIN smart relays.
Cost of the Project.
The total cost of this Voice-Controlled Home Automation (No Coding using IFTTT + ESP8266 project depends on whether you’re doing basic lamp control or scaling up to whole-house control. Here’s a detailed breakdown:
Option 1: Basic Single Lamp Control
Scalable to control lights, fans, and appliances across multiple rooms.
|
Item |
Approx. Cost (INR) |
Approx. Cost (USD) |
|
Shelly Pro 4 PM Smart Relay |
6,000 – 8,500 |
$65 – $95 |
| Enclosure Box + DIN rail | 500 – 800 |
$6 – $10 |
|
Safety Gear (MCB, fuses, etc.) |
800 – 1,200 | $10 – $15 |
| Electrician Installation (optional) |
1,000 – 2,000 |
$12 – $25 |
|
Wi-Fi Router (already owned) |
– | – |
| Total (1 zone/home section) |
8,300 – 12,500 |
$100 – $145 |
Additional Optional Tools
- IFTTT Pro subscription (optional): $2.50/month (for more than 3 applets).
- Blynk IoT Plus (optional advanced control): $5–$10/month for advanced features.
Summary
|
Use Case |
Cost (INR) |
Cost (USD) |
|
Basic Lamp Control |
530 –850 | $7 – $11.5 |
| Full Home Control | 8,300 – 12,500 |
$100 – $145 |
This project lets you build a voice-controlled smart switch using just an ESP8266 and IFTTT — without
writing a single line of code. Start small by automating a lamp, and then scale up using Shelly Pro smart
relays for whole-home control. With basic wiring, internet, and a smartphone, you can make your home
smarter in under an hour.