This article explains how to design a DIY USB fan that is powered by a temperature sensor. Additionally, it provides instructions on how to use a temperature sensor (LM35 or DHT11) to trigger a fan, how to power the project via USB, how to build a control circuit using a transistor, and how to test, calibrate, and upgrade the system.
DIY USB Fan Powered by a Temperature Sensor
The required components to make this DIY USB fan powered by a temperature sensor include the following.
DIY USB Fan Powered by a Temperature Sensor
- LM35 or DHT11 Sensor.
- USB Fan (or 5V DC Fan).
- NPN Transistor (e.g., 2N2222 / BC547).
- Diode (1N4007).
- 10K Ohm Resistor.
- USB Male Plug or Cable.
- Breadboard or PCB.
- Jumper Wires.
- Optional: Arduino Uno (if using DHT11).
Working Principle
The temperature sensor reads ambient temperature. Once the temperature exceeds a set threshold, it activates a transistor, which turns on the fan by allowing current to flow. The fan shuts off when the temperature drops below the threshold.
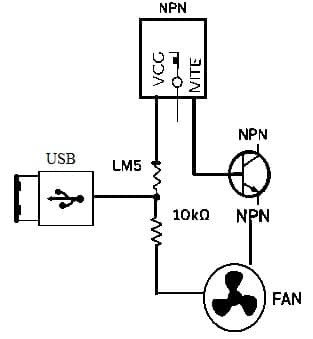
DIY USB Fan Circuit Diagram Overview
- LM35 connected: VCC to +5V, GND to GND, OUT to transistor base via 10K resistor.
- Transistor: Collector to fan (+), Emitter to GND, Fan (-) to GND.
- Flyback diode (1N4007) across fan terminals.
Step-by-Step Instructions
The step-by-step instructions for DIY USB fan powered by a temperature sensor include the following.
- Connect the LM35 to power and the output pin.
- Connect the fan via the transistor circuit.
- Use USB 5V to power the setup.
- Use heat (like your hand) to test the fan activation.
Optional Upgrade using Arduino
- Use DHT11 with Arduino to read temperature and control the fan.
- The sample code checks if the temperature > 30°C to turn on the fan via the digital pin.
- Optional Upgrade Using Arduino
- If using a DHT11 sensor, connect it to an Arduino:
Sample Arduino Code:
#include <DHT.h>
#define DHTPIN 2
#define DHTTYPE DHT11, FAN_PIN 8
DHT dht(DHTPIN, DHTTYPE);
void setup() {
pinMode(FAN_PIN, OUTPUT);
dht.begin();
}
void loop() {
float temp = dht.readTemperature();
if (temp > 30) {
digitalWrite(FAN_PIN, HIGH);
} else {
digitalWrite(FAN_PIN, LOW);
}
delay(2000);
}
DIY USB Fan Estimated Cost
|
Item |
Approx. Cost (INR/USD) |
|
All Basic Components |
300 INR / $4 |
|
With Arduino Upgrade |
800 INR / $10 |
| Tools (Breadboard, wires) |
150 INR / $2 |
Total: 300 INR to 800 INR (~$4 to $10) depending on your setup.
Advantages
The advantages of a DIY USB fan include the following.
- Low cost and easy to build
- USB-powered (can run from power banks)
- Great learning tool for beginners
- Ideal for Raspberry Pi/Arduino enclosures
Safety & Tips
The safety tips for a DIY USB fan are mentioned below.
- Don’t draw more than 500mA from a USB 2.0 port
- Use transistor-rated fans only (5V types)
- Add heatsinks or MOSFET if fan load exceeds 200mA
Conclusion
Building a USB fan controlled by a temperature sensor is a simple and rewarding electronics project
for anyone curious about automation, thermal control, or Arduino basics. Whether you’re using it to
cool a device or just as a smart desk fan, this project is scalable, customizable, and affordable.